Spring/Boot 常用扩展点
前言
Spring 为 Java 程序员开发提供了极大的便利,同时也是非常值得学习的一门框架。其内部有诸多扩展点,用好这些扩展点可以让我们的工作事半功倍,因此本文将练习一些常用的扩展点。
1. FactoryBean
提起 FactoryBean,经常会被问到 FactoryBean 与 BeanFactory 的区别。 BeanFactory 是 Bean 的工厂,可以帮我们生成想要的 Bean,而 FactoryBean 就是一种 Bean 的类型。当往容器中注入 class 类型为 FactoryBean 的类型的时候,最终生成的 Bean 是用过 FactoryBean 的 getObject 获取的。 一般来说,FactoryBean 比较适合那种复杂Bean的构建,在其他框架整合Spring的时候用的比较多。 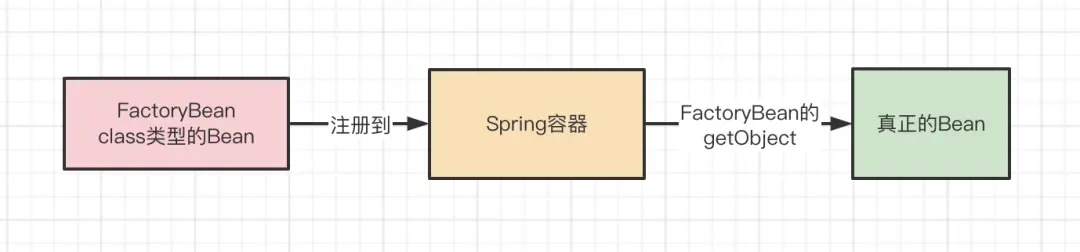
package com.mayee.spring.extension.factorybean;

import com.mayee.bean.User;
import lombok.extern.slf4j.Slf4j;
import org.springframework.beans.factory.FactoryBean;
import org.springframework.context.annotation.AnnotationConfigApplicationContext;

@Slf4j
public class UserFactoryBean implements FactoryBean<User> {
    @Override
    public User getObject() throws Exception {
        User user = new User("1", "UserFactoryBean");
        System.out.println("调用 UserFactoryBean 的 getObject 方法生成 Bean:" + user);
        return user;
    }

    @Override
    public Class<?> getObjectType() {
        // 这个 FactoryBean 返回的Bean的类型
        return User.class;
    }

    static class Application{
        public static void main(String[] args) {
            AnnotationConfigApplicationContext context = new AnnotationConfigApplicationContext();
            //将 UserFactoryBean 注册到容器中
            context.register(UserFactoryBean.class);
            context.refresh();

            log.info("获取到的Bean为" + context.getBean(User.class));
        }
    }
}
2. @Import注解
2.1 实现 ImportSelector 接口
当配置类实现了 ImportSelector 接口的时候,就会调用 selectImports 方法的实现,获取一批类的全限定名,最终这些类就会被注册到Spring容器中。
package com.mayee.spring.extension.importor;

import com.mayee.bean.User;
import lombok.extern.slf4j.Slf4j;
import org.springframework.context.annotation.AnnotationConfigApplicationContext;
import org.springframework.context.annotation.Import;
import org.springframework.context.annotation.ImportSelector;
import org.springframework.core.type.AnnotationMetadata;

@Slf4j
public class UserImportSelector implements ImportSelector {
    @Override
    public String[] selectImports(AnnotationMetadata importingClassMetadata) {
        log.info("调用 UserImportSelector 的 selectImports 方法获取一批类限定名");
        return new String[]{"com.mayee.bean.User"};
    }

    @Import(UserImportSelector.class)
    static class Application{
        public static void main(String[] args) {
            AnnotationConfigApplicationContext applicationContext = new AnnotationConfigApplicationContext();
            //将当前类注册到容器中
            applicationContext.register(Application.class);
            applicationContext.refresh();

            log.info("获取到的Bean为" + applicationContext.getBean(User.class));
        }
    }
}
2.2 实现 ImportBeanDefinitionRegistrar 接口
这个接口相比与 ImportSelector 接口的主要区别就是,ImportSelector接口是返回一个类,你不能对这个类进行任何操作,但是 ImportBeanDefinitionRegistrar 是可以自己注入 BeanDefinition,可以添加属性之类的。
package com.mayee.spring.extension.importor;

import com.mayee.bean.User;
import lombok.extern.slf4j.Slf4j;
import org.springframework.beans.factory.support.AbstractBeanDefinition;
import org.springframework.beans.factory.support.BeanDefinitionBuilder;
import org.springframework.beans.factory.support.BeanDefinitionRegistry;
import org.springframework.beans.factory.support.BeanNameGenerator;
import org.springframework.context.annotation.AnnotationConfigApplicationContext;
import org.springframework.context.annotation.Import;
import org.springframework.context.annotation.ImportBeanDefinitionRegistrar;
import org.springframework.core.type.AnnotationMetadata;

@Slf4j
public class UserImportBeanDefinitionRegistrar implements ImportBeanDefinitionRegistrar {

    @Override
    public void registerBeanDefinitions(AnnotationMetadata importingClassMetadata, BeanDefinitionRegistry registry, BeanNameGenerator importBeanNameGenerator) {
        //构建一个 BeanDefinition , Bean的类型为 User
        AbstractBeanDefinition beanDefinition = BeanDefinitionBuilder.rootBeanDefinition(User.class)
                // 设置 User 这个Bean的属性username的值为三友的java日记
                .addPropertyValue("name", "UserImportBeanDefinitionRegistrar")
                .getBeanDefinition();

        log.info("往Spring容器中注入User");
        //把 User 这个Bean的定义注册到容器中
        registry.registerBeanDefinition("user", beanDefinition);
    }

    @Import(UserImportBeanDefinitionRegistrar.class)
    static class Application {
        public static void main(String[] args) {
            AnnotationConfigApplicationContext applicationContext = new AnnotationConfigApplicationContext();
            //将 Application 注册到容器中
            applicationContext.register(Application.class);
            applicationContext.refresh();

            User user = applicationContext.getBean(User.class);
            log.info("获取到的Bean为" + user + ",属性username值为:" + user.getName());
        }
    }
}
2.3 使用 @Import 注解
@Import的核心作用就是导入配置类,并且还可以根据配合(比如@EnableXXX)使用的注解的属性来决定应该往Spring中注入什么样的Bean。
package com.mayee.spring.extension.importor;

import com.mayee.bean.User;
import lombok.extern.slf4j.Slf4j;
import org.springframework.context.annotation.AnnotationConfigApplicationContext;
import org.springframework.context.annotation.Import;

@Slf4j
@Import(User.class)
public class UserImport {
    public static void main(String[] args) {
        AnnotationConfigApplicationContext applicationContext = new AnnotationConfigApplicationContext();
        //将当前类注册到容器中
        applicationContext.register(UserImport.class);
        applicationContext.refresh();

        log.info("获取到的Bean为" + applicationContext.getBean(User.class));
    }
}
总结: 其实不论是什么样的配置类,主要的作用就是往Spring容器中注册Bean,只不过注入的方式不同罢了。 ImportSelector 和 ImportBeanDefinitionRegistrar 的方法是有入参的,也就是注解的一些属性的封装,所以就可以根据注解的属性的配置,来决定应该返回样的配置类或者是应该往容器中注入什么样的类型的Bean,可以看一下 @EnableAsync 的实现,看看是如何根据 @EnableAsync 注解的属性来决定往容器中注入什么样的 Bean。 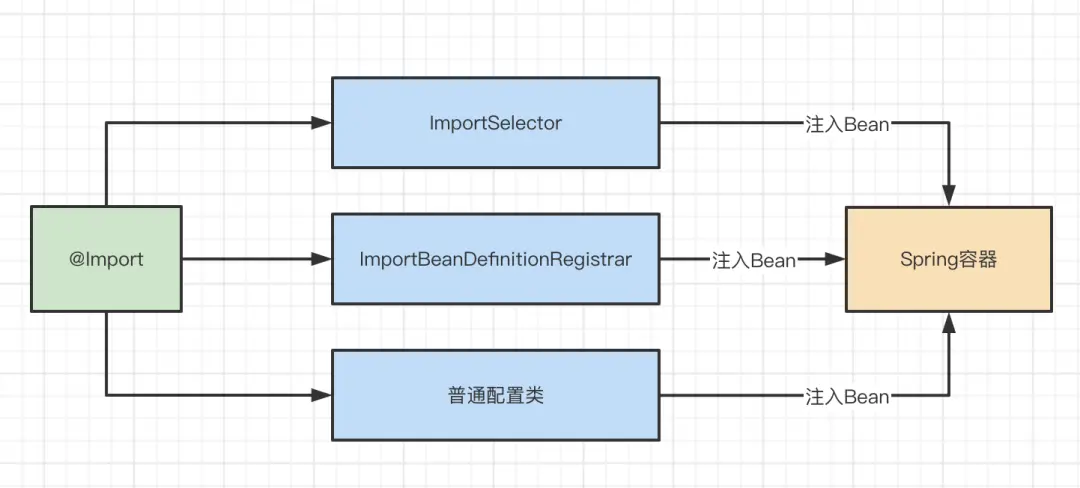
3. Bean 的生命周期
前面提到的 FactoryBean 是一种特殊的 Bean 类型,@Import 注解是往 Spring 容器中注册 Bean。其实不论是 @Import 注解,还是 @Component、@Bean 等注解,又或是 xml 配置,甚至是 demo 中的 register 方法,其实主要都是做了一件事,那就是往 Spring 容器去注册 Bean。 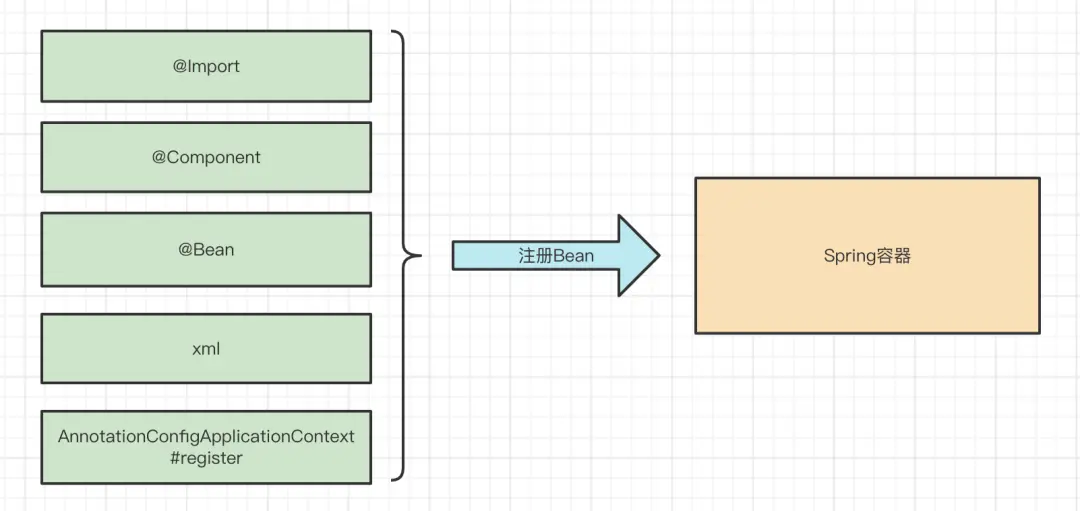
package com.mayee.spring.extension.lifecycle;

import com.mayee.bean.User;
import lombok.extern.slf4j.Slf4j;
import org.springframework.beans.BeansException;
import org.springframework.beans.factory.DisposableBean;
import org.springframework.beans.factory.InitializingBean;
import org.springframework.beans.factory.annotation.Autowired;
import org.springframework.context.ApplicationContext;
import org.springframework.context.ApplicationContextAware;
import org.springframework.context.annotation.AnnotationConfigApplicationContext;
import org.springframework.context.annotation.Bean;

import javax.annotation.PostConstruct;
import javax.annotation.PreDestroy;

@Slf4j
public class LifeCycle implements InitializingBean, ApplicationContextAware, DisposableBean {

    @PostConstruct
    public void postConstruct() {
        log.info("@PostConstruct注解起作用,postConstruct方法被调用了");
    }

    @Autowired
    private User user;

    public LifeCycle() {
        log.info("LifeCycle对象被创建了");
    }

    /**
     * 实现 DisposableBean 注解
     */
    @Override
    public void destroy() throws Exception {
        log.info("DisposableBean接口起作用,destroy方法被调用了");
    }

    /**
     * 通过 {@link Bean#initMethod()}来指定
     *
     * @throws Exception
     */
    public void initMethod() throws Exception {
        log.info("@Bean#initMethod()起作用,initMethod方法被调用了");
    }

    /**
     * 通过 {@link Bean#destroyMethod()}来指定
     *
     * @throws Exception
     */
    public void destroyMethod() throws Exception {
        log.info("@Bean#destroyMethod()起作用,destroyMethod方法被调用了");
    }

    @PreDestroy
    public void preDestroy() throws Exception {
        log.info("@PreDestroy注解起作用,preDestroy方法被调用了");
    }

    /**
     * 实现 InitializingBean 接口
     */
    @Override
    public void afterPropertiesSet() throws Exception {
        log.info("InitializingBean接口起作用,afterPropertiesSet方法被调用了");
    }

    /**
     * 实现的 ApplicationContextAware 回调接口
     */
    @Override
    public void setApplicationContext(ApplicationContext applicationContext) throws BeansException {
        log.info("Aware接口起作用,setApplicationContext被调用了,此时user=" + user);
    }

    /**
     通过测试的结果可以看出,Bean在创建和销毁的过程当我们实现了某些接口或者加了某些注解,Spring就会回调我们实现的接口或者执行的方法。
     同时,在执行setApplicationContext的时候,能打印出User对象,说明User已经被注入了,说明注入发生在setApplicationContext之前。

     总结一下Bean创建和销毁过程中调用的顺序:
     构造方法 -> @Autowired -> xxxAware 接口 -> @PostConstruct -> InitializingBean#afterPropertiesSet -> Bean#initMethod // Bean 创建部分
     -> @PreDestroy -> DisposableBean#destroy -> Bean#destroyMethod // Bean 销毁部分吗,在容器关闭的时候


     Aware接口是指以Aware结尾的一些Spring提供的接口,当你的Bean实现了这些接口的话,在创建过程中会回调对应的set方法,并传入响应的对象
           接口	                                      作用
     ApplicationContextAware	              注入ApplicationContext
     ApplicationEventPublisherAware	      注入ApplicationEventPublisher事件发布器
     BeanFactoryAware	                        注入BeanFactory
     BeanNameAware	                             注入Bean的名称

     有了这些回调,比如说我的Bean想拿到ApplicationContext,不仅可以通过@Autowired注入,还可以通过实现ApplicationContextAware接口拿到。
    */
    static class Application {
        public static void main(String[] args) {
            AnnotationConfigApplicationContext applicationContext = new AnnotationConfigApplicationContext();
            //将 LifeCycle 注册到容器中
            applicationContext.register(Application.class);
            applicationContext.refresh();

            // 关闭上下文,触发销毁操作
            applicationContext.close();
        }

        @Bean(initMethod = "initMethod", destroyMethod = "destroyMethod")
        public LifeCycle lifeCycle() {
            return new LifeCycle();
        }

        @Bean
        public User user() {
            return new User();
        }
    }
}
Bean创建和销毁过程中调用的顺序: 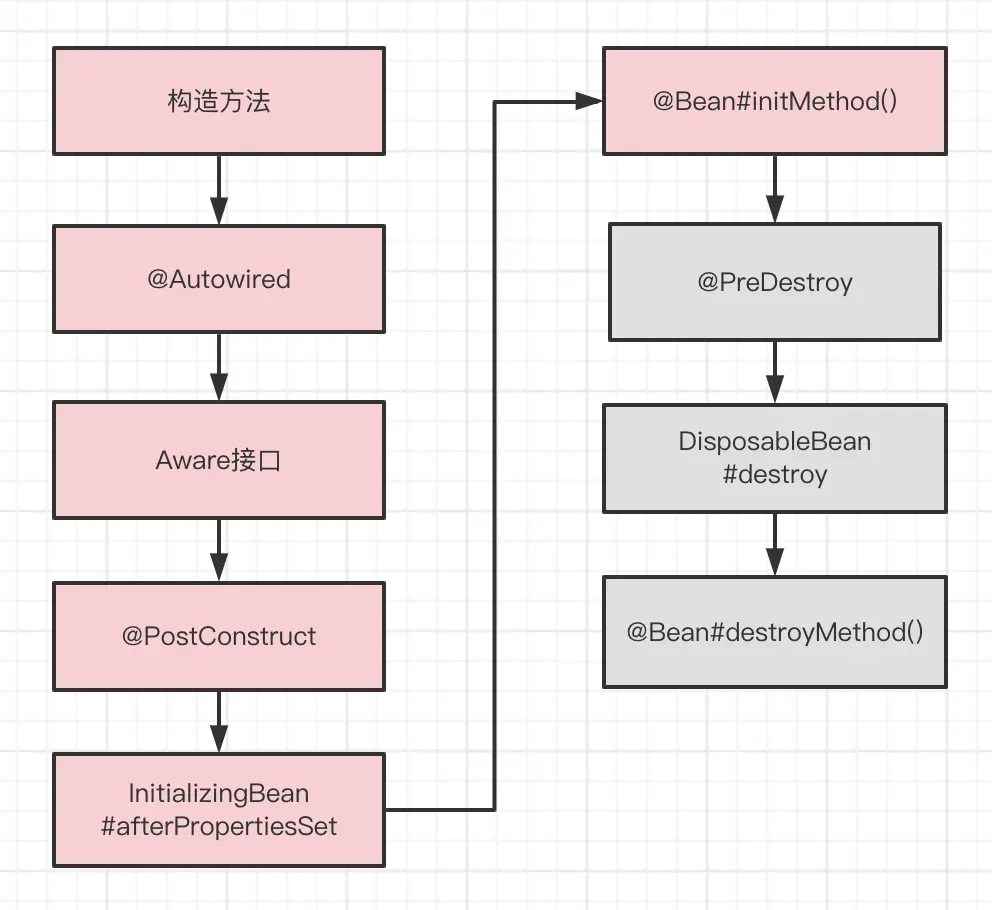
4. BeanPostProcessor
BeanPostProcessor,中文名 Bean 的后置处理器,在 Bean 创建的过程中起作用。 BeanPostProcessor 在 Spring Bean 的扩展中扮演着重要的角色,是 Spring Bean 生命周期中很重要的一部分。正是因为有了 BeanPostProcessor,就可以在Bean 创建过程中的任意一个阶段扩展自己想要的东西。
BeanPostProcessor 是 Bean 在创建过程中一个非常重要的扩展点,因为每个 Bean 在创建的各个阶段,都会回调 BeanPostProcessor 及其子接口的方法,传入正在创建的 Bean 对象,这样如果想对 Bean 创建过程中某个阶段进行自定义扩展,那么就可以自定义 BeanPostProcessor 来完成。 Bean创建的阶段比较多,然后 BeanPostProcessor 接口以及他的子接口 InstantiationAwareBeanPostProcessor、DestructionAwareBeanPostProcessor 就提供了很多方法,可以使得在不同的阶段都可以拿到正在创建的 Bean 进行扩展。
package com.mayee.spring.extension.beanpostprocessor;

import com.mayee.bean.User;
import lombok.extern.slf4j.Slf4j;
import org.springframework.beans.BeansException;
import org.springframework.beans.factory.config.BeanPostProcessor;
import org.springframework.context.annotation.AnnotationConfigApplicationContext;

@Slf4j
public class UserBeanPostProcessor implements BeanPostProcessor {

    @Override
    public Object postProcessAfterInitialization(Object bean, String beanName) throws BeansException {
        if (bean instanceof User) {
            //如果当前的Bean的类型是 User ,就把这个对象 username 的属性赋值为 三友的java日记
            ((User) bean).setName("UserBeanPostProcessor");
        }
        return bean;
    }

    /**
     从结果可以看出,每个生成的Bean在执行到某个阶段的时候,都会回调UserBeanPostProcessor

     Spring内置的BeanPostProcessor:
           BeanPostProcessor	                        作用
     AutowiredAnnotationBeanPostProcessor	    处理@Autowired、@Value注解
     CommonAnnotationBeanPostProcessor	        处理@Resource、@PostConstruct、@PreDestroy注解
     AnnotationAwareAspectJAutoProxyCreator	    处理一些注解或者是AOP切面的动态代理
     ApplicationContextAwareProcessor	        处理Aware接口注入的
     AsyncAnnotationBeanPostProcessor	        处理@Async注解
     ScheduledAnnotationBeanPostProcessor	    处理@Scheduled注解

     处理@Autowired、@PostConstruct、@PreDestroy注解其实就是通过BeanPostProcessor,在Bean的不同阶段来调用对应的方法起作用的。
    */
    static class Application{
        public static void main(String[] args) {
            AnnotationConfigApplicationContext applicationContext = new AnnotationConfigApplicationContext();
            //将 UserBeanPostProcessor 和  User 注册到容器中
            applicationContext.register(UserBeanPostProcessor.class);
            applicationContext.register(User.class);
            applicationContext.refresh();

            User user = applicationContext.getBean(User.class);
            log.info("获取到的Bean为" + user + ",属性username值为:" + user.getName());
        }
    }
}
5. BeanFactoryPostProcessor
BeanFactoryPostProcessor 是可以对 Spring 容器做处理的,方法的入参就是 Spring 的容器,通过这个接口,就对容器进行为所欲为的操作。
package com.mayee.spring.extension.beanfactorypostprocessor;

import org.springframework.beans.BeansException;
import org.springframework.beans.factory.config.BeanFactoryPostProcessor;
import org.springframework.beans.factory.config.ConfigurableListableBeanFactory;
import org.springframework.beans.factory.support.DefaultListableBeanFactory;
import org.springframework.context.annotation.AnnotationConfigApplicationContext;

public class MyBeanFactoryPostProcessor implements BeanFactoryPostProcessor {
    @Override
    public void postProcessBeanFactory(ConfigurableListableBeanFactory configurableListableBeanFactory) throws BeansException {
        // 禁止循环依赖
        ((DefaultListableBeanFactory) configurableListableBeanFactory).setAllowCircularReferences(false);
    }

    static class Application {
        public static void main(String[] args) {
            AnnotationConfigApplicationContext applicationContext = new AnnotationConfigApplicationContext();
            // 注入到Spring容器中就会生效
            applicationContext.register(MyBeanFactoryPostProcessor.class);
            applicationContext.refresh();
        }
    }
}
6. SPI机制
SPI全称为 (Service Provider Interface),是一种动态替换发现的机制,一种解耦非常优秀的思想,SPI 可以很灵活的让接口和实现分离, 让api提供者只提供接口,第三方来实现,然后可以使用配置文件的方式来实现替换或者扩展,在框架中比较常见,提高框架的可扩展性。
JDK 有内置的 SPI 机制的实现 ServiceLoader,Dubbo 也有自己的 SPI 机制的实现 ExtensionLoader,Spring 的 SPI 机制的实现了 SpringFactoriesLoader。
package com.mayee.spring.extension.spi;

import com.mayee.spring.extension.factorybean.UserFactoryBean;
import org.springframework.context.annotation.Bean;

/**
 * UserAutoConfiguration 虽然没有加 @Configuration 注解,但由于在 spring.factories 中配置了值,@SpringBootApplication 中的 @EnableAutoConfiguration 就会中 spring.factories 中加载到配置项,然后注入到容器中
 */
public class UserAutoConfiguration {
    @Bean
    public UserFactoryBean userFactoryBean() {
        return new UserFactoryBean();
    }
}
spring.factories:
# org.springframework.boot.autoconfigure.EnableAutoConfiguration=com.mayee.spring.extension.spi.UserAutoConfiguration

# PropertySourceLoader
org.springframework.boot.env.PropertySourceLoader=com.mayee.spring.extension.propertysourceloader.JsonPropertySourceLoader
package com.mayee.spring.extension.spi;

import com.mayee.bean.User;
import lombok.extern.slf4j.Slf4j;
import org.springframework.boot.SpringApplication;
import org.springframework.boot.autoconfigure.SpringBootApplication;
import org.springframework.context.ConfigurableApplicationContext;
import org.springframework.core.io.support.SpringFactoriesLoader;

import java.util.List;

@Slf4j
@SpringBootApplication
public class MyEnableAutoConfiguration {

    public static void main(String[] args) {
        List<String> classNames = SpringFactoriesLoader.loadFactoryNames(MyEnableAutoConfiguration.class, MyEnableAutoConfiguration.class.getClassLoader());
        log.info("spi 中的配置: ");
        classNames.forEach(System.out::println);

        ConfigurableApplicationContext applicationContext = SpringApplication.run(UserAutoConfiguration.class);
        User user = applicationContext.getBean(User.class);
        log.info("获取到的Bean为" + user);
    }
}
7. PropertySourceLoader
在 SpringBoot 环境下,外部化的配置文件支持 properties 和 yaml 两种格式。但是,现在不想使用 properties 和 yaml 格式的文件. 对 于PropertySourceLoader 的实现,SpringBoot 两个实现: PropertiesPropertySourceLoader:可以解析 properties 或者 xml 结尾的配置文件 YamlPropertySourceLoader:解析以 yml 或者 yaml 结尾的配置文件
SpringBoot 对于配置文件的处理,就是依靠SPI机制, SpringBoot 会先通过 SPI 机制加载所有 PropertySourceLoader,然后遍历每个 PropertySourceLoader,判断当前遍历的 PropertySourceLoader,通过getFileExtensions 获取到当前 PropertySourceLoader 能够支持哪些配置文件格式的解析,让后跟当前需要解析的文件格式进行匹配,如果能匹配上,那么就会使用当前遍历的 PropertySourceLoader 来解析配置文件。 PropertySourceLoader 其实就属于策略接口,配置文件的解析就是策略模式的运用。
package com.mayee.spring.extension.propertysourceloader;

import com.alibaba.fastjson.JSON;
import com.alibaba.fastjson.JSONObject;
import org.springframework.boot.env.PropertySourceLoader;
import org.springframework.core.env.MapPropertySource;
import org.springframework.core.env.PropertySource;
import org.springframework.core.io.Resource;

import java.io.IOException;
import java.nio.ByteBuffer;
import java.nio.channels.ReadableByteChannel;
import java.util.Collections;
import java.util.HashMap;
import java.util.List;
import java.util.Map;

public class JsonPropertySourceLoader implements PropertySourceLoader {
    @Override
    public String[] getFileExtensions() {
        //这个方法表明这个类支持解析以json结尾的配置文件
        return new String[]{"json"};
    }

    @Override
    public List<PropertySource<?>> load(String name, Resource resource) throws IOException {

        ReadableByteChannel readableByteChannel = resource.readableChannel();

        ByteBuffer byteBuffer = ByteBuffer.allocate((int) resource.contentLength());

        //将文件内容读到 ByteBuffer 中
        readableByteChannel.read(byteBuffer);
        //将读出来的字节转换成字符串
        String content = new String(byteBuffer.array());
        // 将字符串转换成 JSONObject
        JSONObject jsonObject = JSON.parseObject(content);

        Map<String, Object> map = new HashMap<>(jsonObject.size());
        //将 json 的键值对读出来,放入到 map 中
        for (String key : jsonObject.keySet()) {
            map.put(key, jsonObject.getString(key));
        }

        return Collections.singletonList(new MapPropertySource("jsonPropertySource", map));
    }
}
package com.mayee.spring.extension.propertysourceloader;

import com.mayee.bean.User;
import lombok.extern.slf4j.Slf4j;
import org.springframework.boot.SpringApplication;
import org.springframework.boot.autoconfigure.SpringBootApplication;
import org.springframework.context.ConfigurableApplicationContext;
import org.springframework.context.annotation.Bean;

@Slf4j
@SpringBootApplication
public class MyPropertySourceLoader {

    public static void main(String[] args) {
        ConfigurableApplicationContext applicationContext = SpringApplication.run(MyPropertySourceLoader.class);

        User user = applicationContext.getBean(User.class);

        log.info("获取到的Bean为" + user + ",属性username值为:" + user.getName());
    }

    @Bean
    public User user() {
        return new User();
    }
}
尾声
目前先练习这几个扩展点的使用,更多扩展点的介绍请见下方参考资料一栏,浏览原文学习。
Tip:本文完整示例代码已上传至 Gitee